
As your party's frontline tank, you need to hold enemy attention while keeping the boss facing away from your allies. The recommended AION 2 Templar build for PvE endgame is Judgment Templar, with Defense, HP, and Block as its main stats, Pummel and Judgment as your first leveling priorities, and four-piece Magic Armor for PvE defense. This setup combines damage with enmity generation; its recommendation applies to PvE tanking, without establishing a best build for PvP.
Should you build for leveling or endgame tanking?
Leveling: prioritize Pummel, then Judgment
Start by putting points into Pummel, then Judgment. These skills provide most of your damage, so investing there gets the core of the build working before you spread points across utility. Use spare points for your other skills.
You can take most defensive passives later. Leveling does not demand the same survivability as endgame tanking, which makes early damage investment the recommended route. Check your skill levels after allocating points: Pummel and Judgment should be your first priorities, rather than an even spread across the whole bar.
Endgame PvE: add survivability and enmity
For party tanking, keep the damage core and build out your defensive passives, mitigation, and Taunt. Punishing Benediction and Fury increase damage, while Insulting Roar helps generate enmity. Damage matters here because the build aims to keep enemies targeting you while still contributing to the fight.
The practical check is enemy behavior: you should be taking their attention, with the boss facing away from your party. If you are still deciding which role to play, use the AION 2 class tier list alongside this setup. If you want to compare another melee build before investing, see the AION 2 Gladiator build.
Which skill levels and specialties should you use?
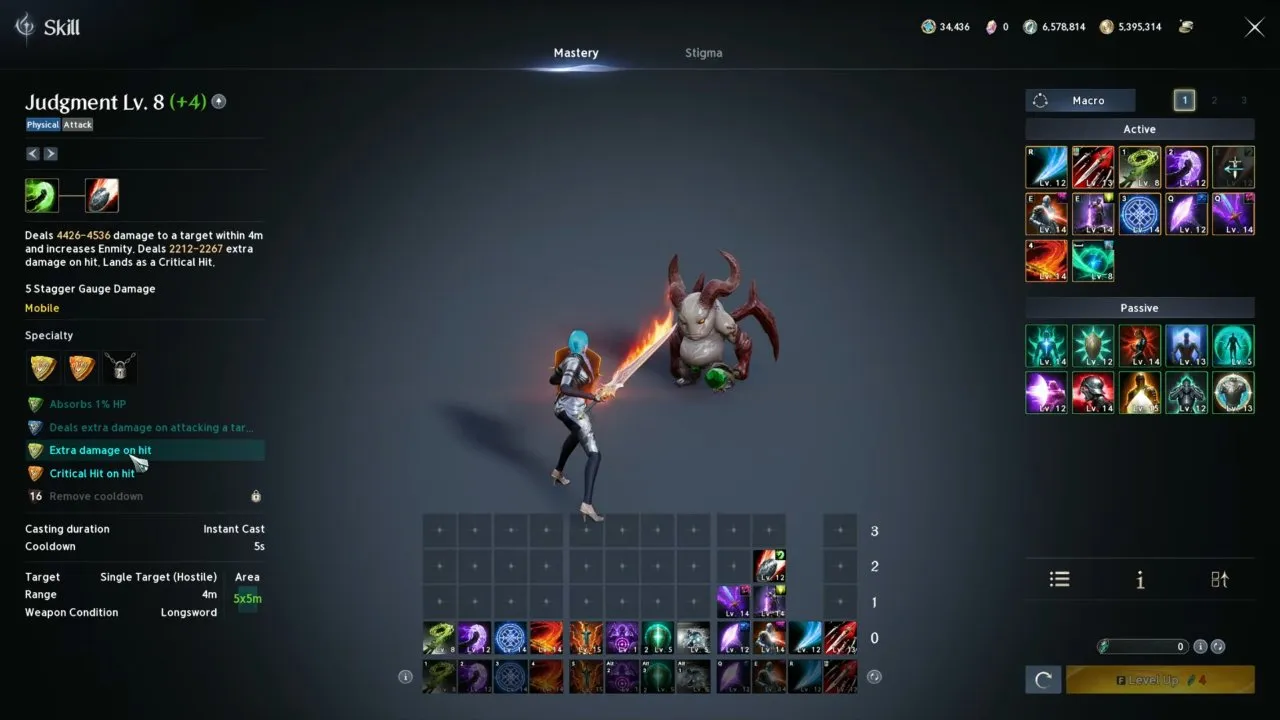
These are the endgame active-skill targets. Treat them as the finished setup, rather than a requirement before you can begin leveling.
| Skill | Target level | Specialties to select |
|---|---|---|
| Pummel | 20 | Punishing Strike absorbs 3% HP; up to 12% damage when fewer targets are hit; Punishing Strike gains extra damage on hit |
| Judgment | 20 | Extra damage on hit; critical hit on hit; changes to an AoE skill |
| Punishment | 20 | +30% skill speed; damage over time on hit; ignores Block and Evasion and lands as a critical hit |
| Vicious Strike | 16 | Absorbs 1% HP; adds Threatening Blow chain skill |
| Warding Strike | 16 | Cooldown reduced by 5 seconds; +100 Block during Warding |
| Poach | 16 | Moves to a target with Incapacitated Immunity; protective shield equal to 10% of maximum HP |
| Shield Smite | 16 | Removes MP cost and restores 200 MP on hit; 50% chance to trigger Debilitating Smash on hit |
| Annihilate | 16 | +50% Multi-Hit on hit; +100% damage to targets |
| Debilitating Smash | 16 | Debilitate duration increased by 3 seconds; ignores Block and Evasion and lands as a Multi-Hit |
| Shield Rush | 16 | Range increased by 10 meters; cooldown reduced by 10 seconds |
After spending points, compare both the displayed level and specialty descriptions with this table. Level alone is only half the setup: Shield Smite's MP restoration and Warding Strike's Block bonus are specific selections you want to retain.
Aim for level 10 in Enhance Health, Warding Shield, Punishing Benediction, Ironclad Defense, Guarding Seal, Insulting Roar, Survival Willpower, and Fury. The damage and enmity passives keep your offensive tank role working; the remaining passives focus on surviving the attacks you draw.
How should you open a fight and arrange your macro?
The skill bar can look like a straight damage sequence at first. In practice, Judgment, Debilitating Smash, and Annihilate are triggered procs tied to Block or Judgment triggers, so their availability matters. Stack them in that priority order, with Pummel lowest, and keep your other utility skills independently accessible.
Use Pummel and Shield Rush for the simple macro setup. Set Macro Display MS to half your current ping. Keep defensive and utility decisions under your control instead of folding every button into the same sequence. Shield Rush can stun and deals stagger damage, but a chance to stun is not a guaranteed result.
Prepare your party buff and take the lead
Use Battlefield Banner with your party's timed burst window. Let pre-combat preparations, such as Chanter buffs, happen before you initiate combat. You set the pace once you engage; check that enemies direct their attention toward you. For the support side of that preparation, see the AION 2 Chanter build.
Close with Doom Shield and fully charge Punishment
Doom Shield provides a gap closer without the specific conditions attached to Shield Rush or Assault Fury, and it supplies a Judgment trigger on cast. Follow it with a fully charged Punishment. Check that you have closed the distance and watch for Judgment's triggered availability before treating the bar as a fixed sequence.
Use Warding Strike, Shield Smite, then Pummel
Follow Punishment with Warding Strike, then Shield Smite, then Pummel for the main damage portion. With the selected specialties, Warding gives extra Block and Shield Smite restores 200 MP on hit. Check your MP after a successful Shield Smite hit; Debilitating Smash may also trigger, but its 50% chance means you should not expect it every time.
Keep the boss facing away and respond with utility
Hold the boss facing away from allies to reduce their exposure to frontal cleaves and AoE attacks and support classes that use back attacks. Use Taunt to maintain enmity on bosses or reach smaller mobs outside melee range. Check the boss's facing and target after you reposition or use Taunt. Extra damage is a poor trade if your positioning exposes the party to frontal attacks.
Which stigma skills should you keep ready?
| Stigma | Target level | When it earns its slot |
|---|---|---|
| Noble Armor | 20 | Substantial damage mitigation for the boss's strongest attacks or a large group of mobs |
| Battlefield Banner | 20 | Party damage buff synchronized with timed burst windows |
| Taunt | 15 | Maintaining boss enmity or targeting mobs beyond melee range |
| Doom Shield | 15 | Reliable gap closing and a Judgment trigger on cast |
Opening mitigation when you need survivability
Keep Noble Armor available for heavy incoming damage. The safer timing is around the boss's strongest attacks or substantial mob pressure. Check that the listed level 20 stigma is in your setup and independently accessible before entering the fight.
Holding mitigation for later
The opening guidance allows skipping its named Noble Soul when you do not need extra survivability at the start. Given the naming discrepancy, that does not establish an exact Noble Armor opener. The useful decision is still clear: time your known mitigation around dangerous incoming damage, and align Battlefield Banner with party burst.
What gear and progression bonuses complete the build?
The recommended main weapon is Enraged Kromede Sword, paired with Nuakum Guard in the off-hand. These are equipment targets.
| Slot | Listed stats | Soul Bind choices |
|---|---|---|
| Enraged Kromede Sword | 340 to 425 Attack; 50 Critical Hit; 200 Block | Attack, Front Attack, Precision |
| Nuakum Guard | Attack entry starts at 204; 50 Critical Hit; 0 Block | Attack, Weapon Damage Boost, Precision, Front Attack |
Nuakum Guard's full Attack range is incomplete, so do not read 204 as a verified full range. For both pieces, choose Attack, Defense, Accuracy Bonus, and Block for Superior Abyssal Manastones, with Mahisha's Wrath as the Theostone. Check the item names and selected bonuses when comparing your equipment to these targets.
Arcana: four-piece Magic Armor is recommended
Use Chalice of Magic, Parchment of Magic, Compass of Magic, Bell of Magic, and Mirror of Vigor. The core defensive effect is four-piece Magic Armor: it grants +1000 PvE Defense while MP is at least 50%, and restores 1500 MP when HP is at or below 20%, with a 30-second cooldown.
At a glance, that may look like a low-HP emergency set. The ongoing defense bonus actually depends on your MP threshold. Watch your MP bar and check that the four-piece set is active; Shield Smite's MP restoration is a useful part of this setup. Primal Vigor is also listed among the build's set effects, but its exact bonus is not specified.
Target Time, Life, Freedom, and Justice for Deity stats, with Punishment Lv. 4, Judgment Lv. 4, and Pummel Lv. 4 as sub skills.
Pantheon and Daevanion: finish your core skill levels
Pantheon priorities are Time, Life, Freedom, and Justice. This portion of the build emphasizes survivability, while taking damage bonuses from other equipment where possible.
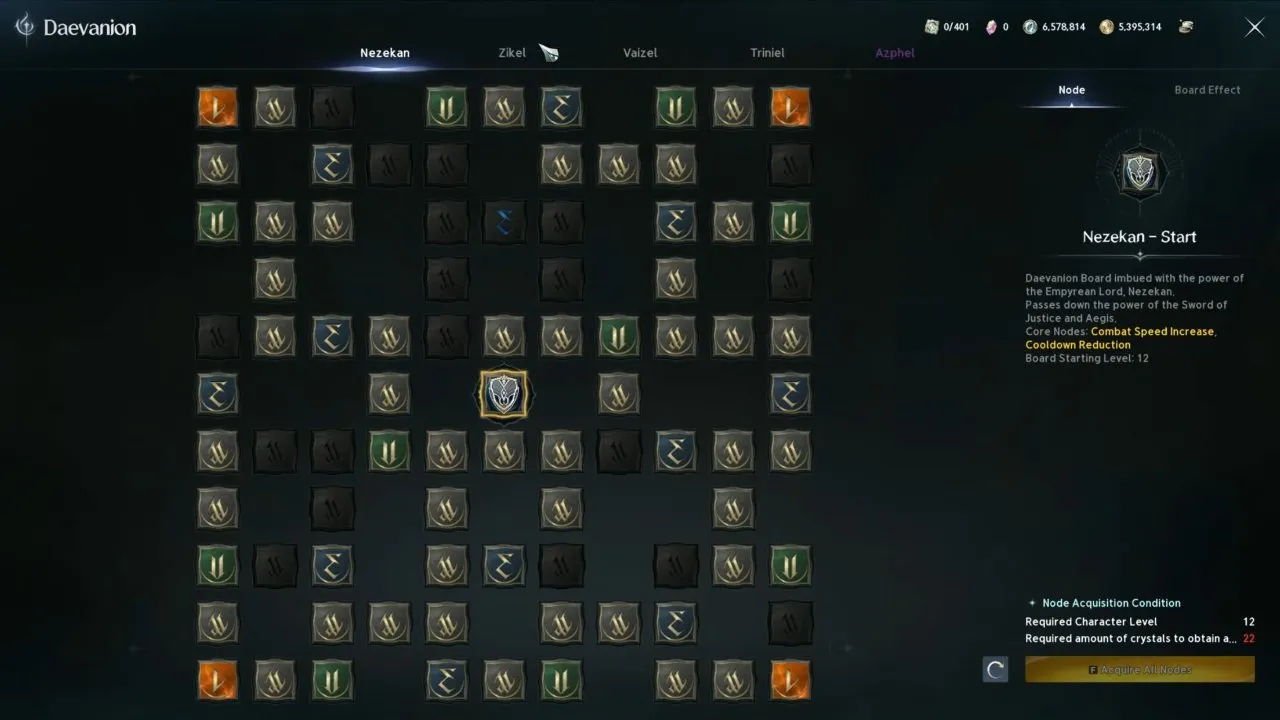
| Daevanion board | Priority order |
|---|---|
| Nezekan | Combat Speed, Judgment, Cooldown Reduction, Punishment |
| Zikel | Damage Tolerance, Judgment, Penetration, Insulting Roar |
| Vaizel | Critical Damage Boost, Critical Damage Tolerance, Annihilate, Punishment |
| Triniel | Multi-Hit Chance, Multi-Hit Resistance, Judgment, Punishment |
On the way to orange stat nodes, obtain all skill levels for Judgment, Pummel, and Punishment to increase damage and unlock their specialties. Check those skill levels and specialties before spending additional points on passives and bonus stats. This keeps your progression tied to the skills the build actually uses.
With the setup assembled, you have a PvE tank built around damage, enmity, and controlled mitigation. Your next job is party coordination: hold the boss's facing, line up Battlefield Banner with burst, and discuss recovery with your healer using the AION 2 Cleric build.